nickyzimbler1105@gmail.com +447897368870
nickyzimbler1105@gmail.com +447897368870
jan
2022

Mid century modern style: The modern drop-
in chair
Your first upholstery project needs to be an easy, uncomplicated project, so that you can easily start to understand the process of upholstery, learn about the materials and tools you will need, and learn some basics.


For this project I used a Kai Kristiansen Chair, model 31, a well known and well loved classic mid century dining chair.
When describing this project, I will go into very basic detail so that the novice upholsterer can do this from home. You will need a few days if you are a beginner.
Stripping the chair:
Remove all the covers, old foam, old webbing and hessian as necessary but using a good staple remover. I find that different staple removers suit different size and age of staples so it’s worth experimenting a bit with these.
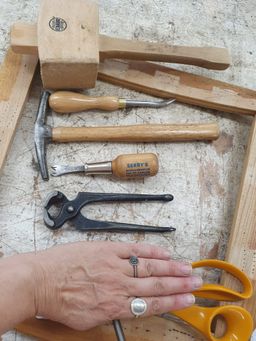
My favourite is always Berry’s staple remover
but you could try
I always use a drapers pincer to remove the broken pieces of staple. Make sure you wear gloves, good gardening or DIY gloves will do, and face the staple remover away from you, and not sideways, as you are less likely to hurt yourself this way.
Any very small remnants of staples you can remove can be hammered into the chair. The wood should be smooth to the feel and free of any staples.

September 2021
Webbing
Measure and space the webbing around 4cm/1.5 inches apart. I used elastic webbing, you could also use rubber. Leave 2cm clear all the way around the chair edges. My chair is curved, so I needed to put the webbing front to back OVER the side to side webbing. This will hold the shape of the curve. I used tension to attach the webbing at each side, and placed 10mm staples in a neat row across the webbing, 3 rows at each end. I used a pneumatic staple gun but you can use a manual staple gun, you need to care that use enough tension by holding the fabric or webbing very tightly.


Hessian and foam
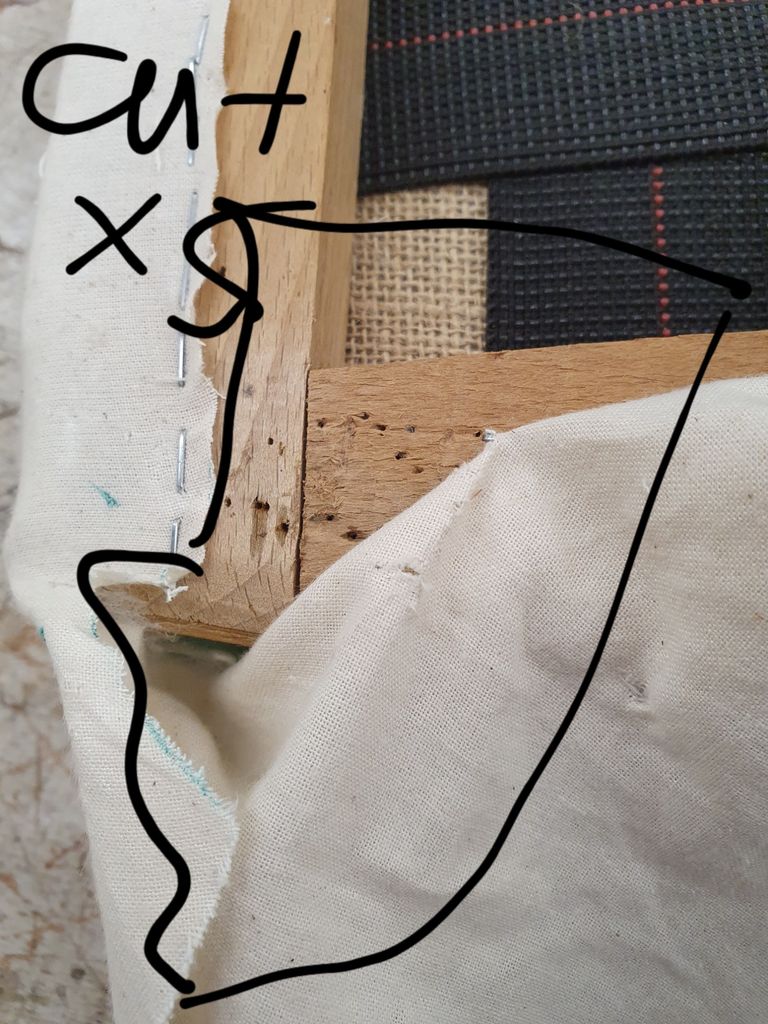
Next you need to add a layer of hessian. I used 10oz hessian. Measure the widest parts of the chair and add 5cm extra all the way round to get the correct size. Lay it over the webbing, create a hem and fold the hessian over, and staple along the back and 1 side, then on the other side, staple under tension without a hem, then fold over and staple again, and do the same to the front (staple under tension, fold over the create a hem and staple again.) Trim the excess hessian to leave a neat hem.
I used 1 inch blue HR40 (high resilience, 40 Dense) seat foam.
You can see from my photo that I glued to pieces together left over from another project. (Remember, reuse materials and left over waste as much as you can! )
Cut a piece of foam which fits exactly to the shape of the chair to the edge and no further.
Place on top of the chair, fold in half and spray adhesive to both the hessian and the foam and press down, and do the same on the other side.
Cotton felt wadding
The next layer is cotton felt wadding, this adds comfort and fire retardant properties. I used 2 layers of 2oz wool cotton wadding, the first layer made in the same shape as size of the foam, and the second layer, slightly larger by 5cm or so, which falls over the edge of the foam and stops just above the wood. you need to keep the wood frame the same size so that it fit’s back in to the chair, so avoid allowing the felt to encroach on the wood.
Polyester FR (fire retardant) Wadding
Cut a piece of 2oz FR wadding to fit to the edge of the cotton wadding but not as far as the wood seat, and place over the second layer of cotton wadding.
Calico
I used FR calico. Measure the chair, including the wood seat, front to back and side to side, add 2 inches / 5cm all around and cut a piece of calico (and this will also be your top fabric measurement). Fold in half, both ways and cut a tiny mark to mark the halfway point on all 4 sides.
Turn the seat over and accurately measure and mark each side in half.
Position the calico, mark at the front to correspond to the front mark on the calico, add the 2 inch allowance at the front of the seat, turn the seat over and using your arm to add tension to the seat on your bench, temporary tack (10mm fine tacks) the back of the calico, start in the middle and do one side, then the other side, hold the tension of the fabric on the seat as you turn it , holding your arm on the seat, on top of the bench, without letting the tension off, and do the same at the front. Make sure your wadding sits above the wood when you cover with calico, remember the seat needs to fit back in!
When you look at the front and back edge of the chair now, it should look nice and smooth. Use your hand to smooth it out, if you see indentations, alter the tension of the fabric by removing tacks and replacing them, letting the fabric out, or pulling it in where needed so that you see a nice smooth edge
Now pull tension on the calico, on the sides. Place one side down to hold the fabric tensioning tack the other side, middle first outwards. Hold the tension, turn to do the other side. Alter the tension on both sides and more on the front and back as needed to make the whole chair edges look smooth and uniform. This is a tricky thing to do and will take some practice but it’s really important to get a good shape and precise looking edge on your chair.
Once you are happy with the shape and edges, staple in a neat row 2cm from the edge of the chair, staples must be close together so as to keep the tension in the fabric, don’t staple right to the corners, make your staples form a curved shape.


Corners:
Remember this rule:
On the back of the seat there are pleats at the side
On the front of the seat there are pleats at the front
Start with the back and complete this row of staples in it’s entirety. the staples at the edge should curve down to the corners of the seat.
There are 3 steps to forming a corner:
pull fabric at the back along the line of the seat and place 1 staple to hold it in place
pull fabric at an angle and remove the excess
make a fold with the side, use one hand to pull a single thickness of fabric down to naturally form a pleat on the side and secure with a staple.
Repeat the other 3 corners, pleats on the sides at the back and on the front at the front.
Fire retardant
Add a thin layer of wool FR, wool side up, cut to just above wood edge.
Top fabric.
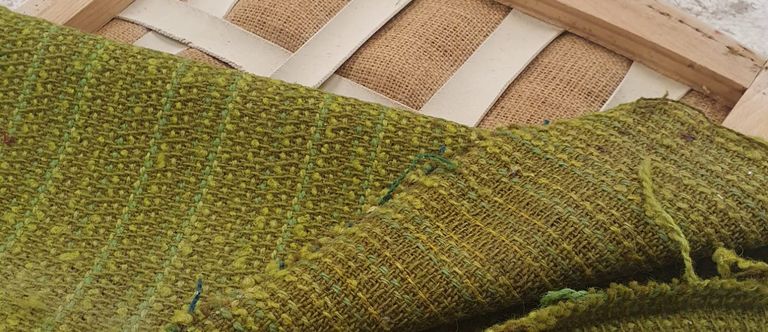
I used a wool fabric but you can use whatever you prefer, as long as it is appropriate for the area the chair will sit.
Measure twice to check measurements and cut the top fabric adding 5cm all around, making sure the weave sits front to back and the weft (the sides of the fabric so the selve edges) face side to side.
Measure halfway points and temporary pin front and back as per the calico layer. and then temporary tack all 4 sides as per calico layer.
Staple all of the back, keep the staples away from the edge of the chair. Top fabric should cover over the calico layer. Staple the rest away from corners.
Pleat the corners as you did the calico layer.
Once the top layer is full stapled, cut the top fabric to the edge of the staples.
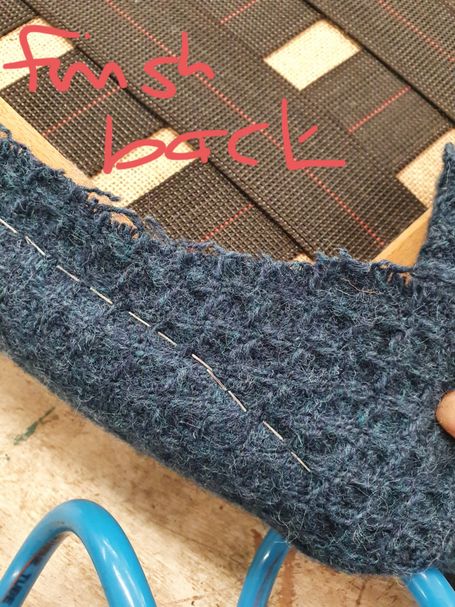
Bottom cloth
Use black polypropylene or cotton back cloth and cut to size plus 5cm. Place 4 tacks on the chair, north, south east and west. (i.e mid point of each side) Add 0.5cm hem and fold under, and make a hem which sits half an inch from the edge of the seat, and pin the 4 corners then staple all the way round.
Restore the wood of the chair before replacing the seat.


We need your consent to load the translations
We use a third-party service to translate the website content that may collect data about your activity. Please review the details in the privacy policy and accept the service to view the translations.